- An Introduction to LibreOffice: Your Complete Guide to the Open Source Office Suite
- LibreOffice Overview: Your Free and Open Source Office Suite
- How to Download and Install LibreOffice on Windows, macOS and Linux
- Getting Started with LibreOffice Writer: A Comprehensive Guide
- Mastering Intermediate Features in LibreOffice Writer
- Advanced Techniques in LibreOffice Writer: Master Documents, Macros and Custom Styles
- Getting Started with LibreOffice Calc: Your Guide to Spreadsheets
- Advanced LibreOffice Calc Features: Data Analysis, Pivot Tables and Complex Formulas
- Getting Started with LibreOffice Base: Managing Databases
- Getting Started with LibreOffice Draw: Creating Diagrams and Technical Drawings
- Getting Started with LibreOffice Math: Creating and Formatting Equations
- How LibreOffice Applications Work Together: Mail Merge, Data Linking and Automation
- Bonus Impress Project: Creating Interactive Presentations with Hyperlinks and Custom Animations
- Bonus Impress Project: Creating a Multimedia-Rich Presentation
- Bonus Base Project: Building a CRM System for Managing Customer Data and Interactions
- Bonus Base Project: Building an Inventory Management System in LibreOffice Base
Welcome to your first in-depth tutorial in our LibreOffice series! In this post, we’ll introduce you to LibreOffice Writer, the powerful word processor that’s perfect for everything from casual writing to professional reports. Whether you’re new to word processing or switching from Microsoft Word, this guide will take you through the basics and get you familiar with Writer’s essential features.
By the end of this post, you’ll know how to create, format, and save documents, along with some additional tips to help you navigate Writer with confidence.
Introduction to LibreOffice Writer
LibreOffice Writer is a feature-rich word processor comparable to Microsoft Word. You can use it for:
- Letters and memos
- Reports and books
- Business documents
- And much more
Unlike some proprietary word processors, LibreOffice Writer supports a wide variety of file formats, so you can open and save documents in formats like ODF, DOCX, PDF, and more.
Step 1: Opening LibreOffice Writer
Let’s start by opening LibreOffice Writer:
- Launch LibreOffice:
- Open the LibreOffice application from your desktop or application menu.
- Open Writer:
- In the Start Centre, click on Writer Document to open a blank document. Alternatively, you can directly launch Writer from your system’s application menu.
Step 2: Exploring the Interface
When you first open Writer, you’ll be greeted with a clean and simple interface.
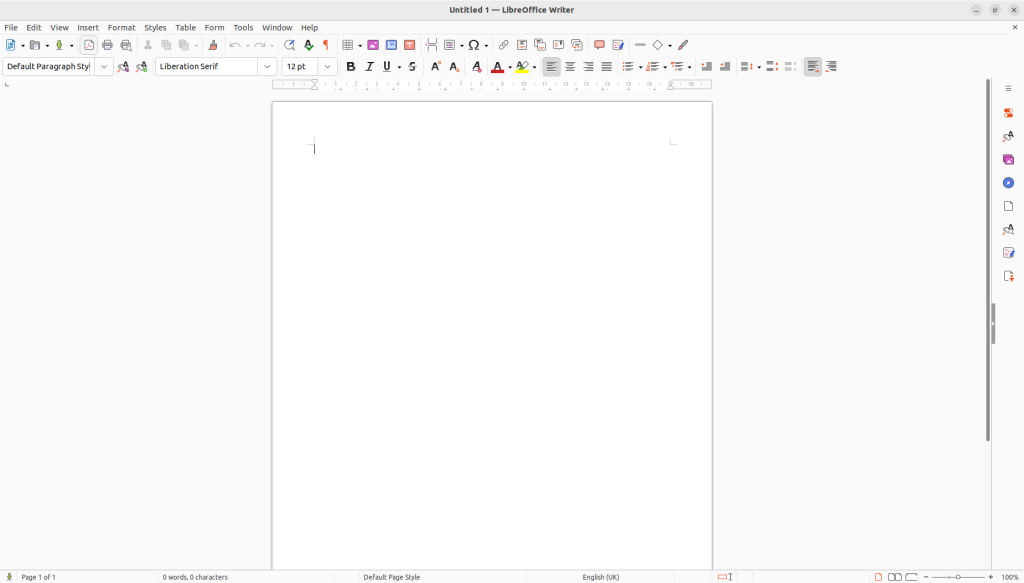
Let’s break down the main parts of the screen:
- Menu Bar:
- Located at the top, this contains dropdown menus for File, Edit, View, Insert, and more. Each menu contains options for performing different tasks.
- Toolbars:
- Below the Menu Bar, you’ll see toolbars with icons for common tasks like New Document, Save, Bold, Italic, and more.
- Hover your mouse over each icon to see its description.
- Sidebar:
- On the right, you’ll find the Sidebar which contains panels for formatting, styles, and page layout. If the sidebar isn’t visible, you can open it by going to View > Sidebar.
- Ruler:
- The horizontal and vertical rulers help you adjust margins, indents, and tab stops.
- Document Area:
- This is where you’ll type and format your document. You can start typing right away!
- Status Bar:
- At the bottom of the screen, the Status Bar shows important information like page number, word count, and zoom level.
Step 3: Creating Your First Document
Let’s create a simple document to get started:
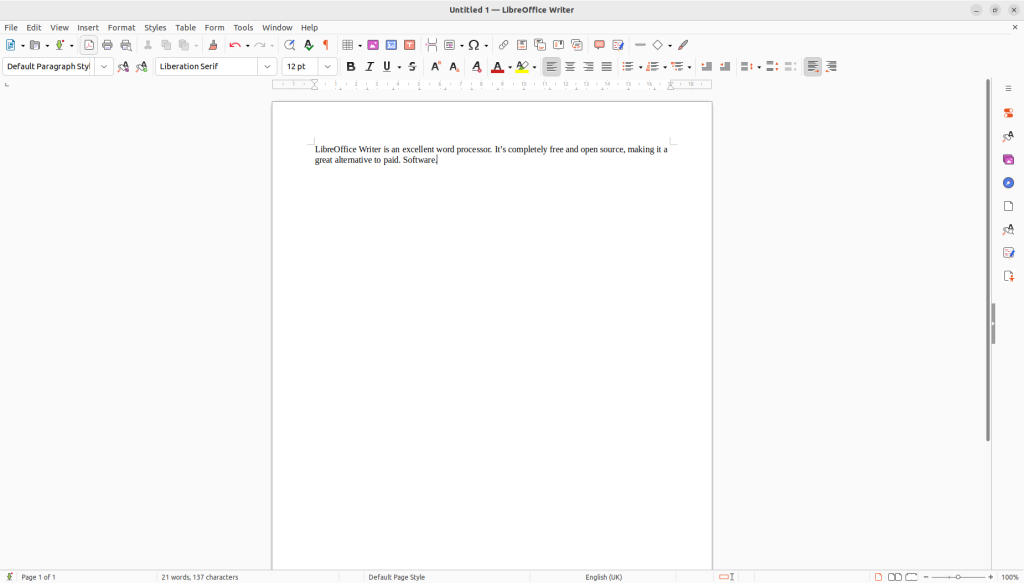
- Type Some Text:
- Click in the document area and start typing. For example:
LibreOffice Writer is an excellent word processor. It’s completely free and open source, making it a great alternative to paid software.
- Click in the document area and start typing. For example:
- Save the Document:
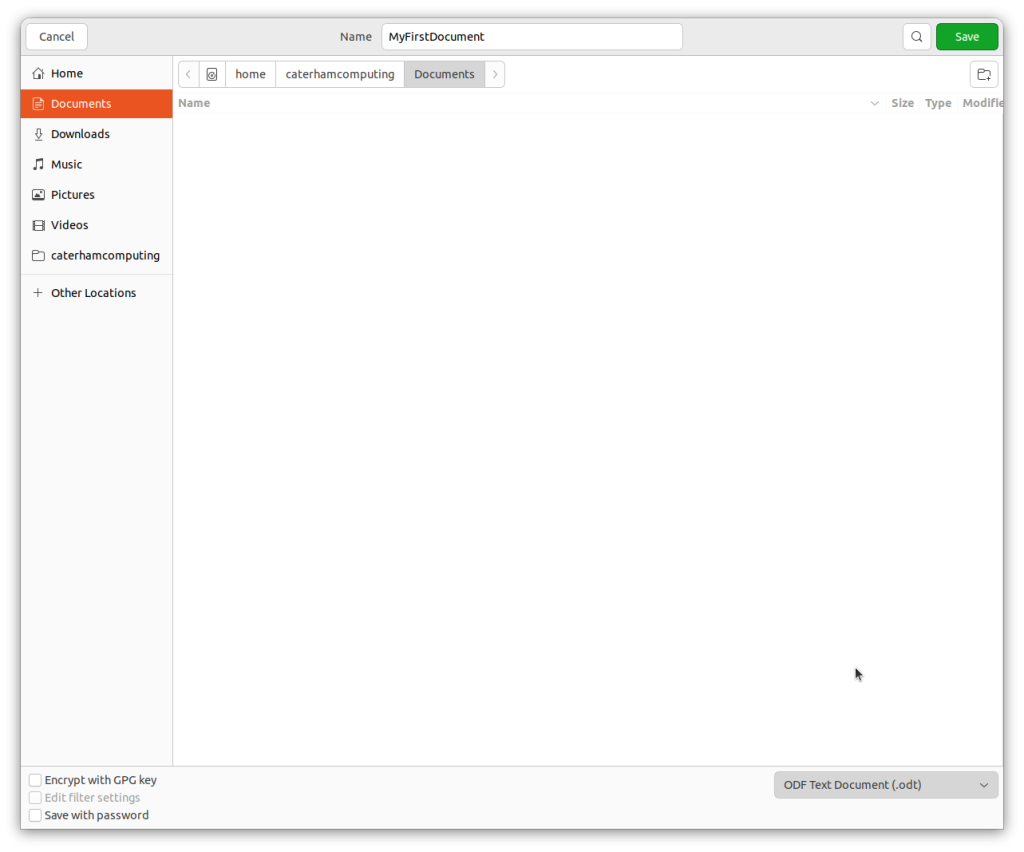
- It’s always a good idea to save your work. Click File > Save As.
- Choose a location and give your file a name (e.g.,
MyFirstDocument.odt). - You can save it as an ODT file (LibreOffice’s native format) or choose Microsoft Word 2007–365 (.docx) from the Save as type dropdown if you need to share the file with users of Microsoft Word.
Step 4: Basic Text Formatting
LibreOffice Writer makes it easy to format text. Let’s go over some basic formatting options:
Changing Font and Size:
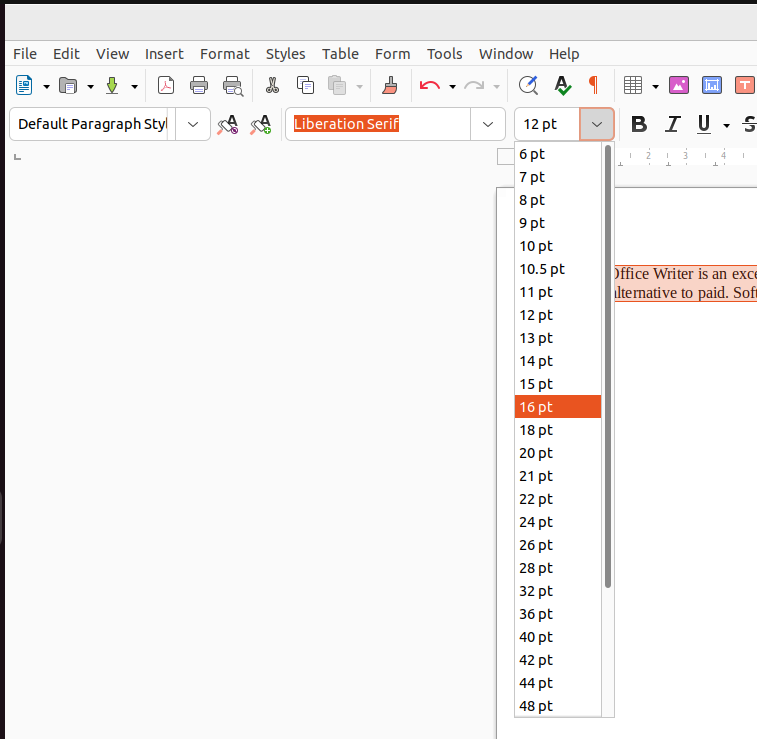
- Highlight the text you want to format.
- In the toolbar, select a new Font (e.g., Arial) from the dropdown menu.
- To change the size, use the Font Size dropdown menu or type a value (e.g., 12pt).
Bold, Italic, and Underline:
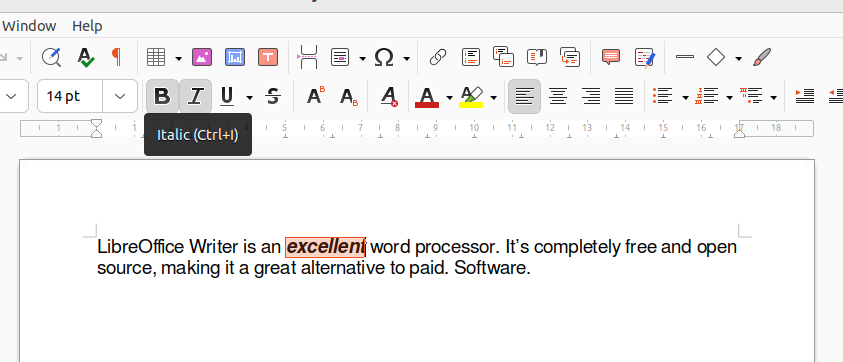
- Select the text you want to format and click B (Bold), I (Italic), or U (Underline) in the toolbar.
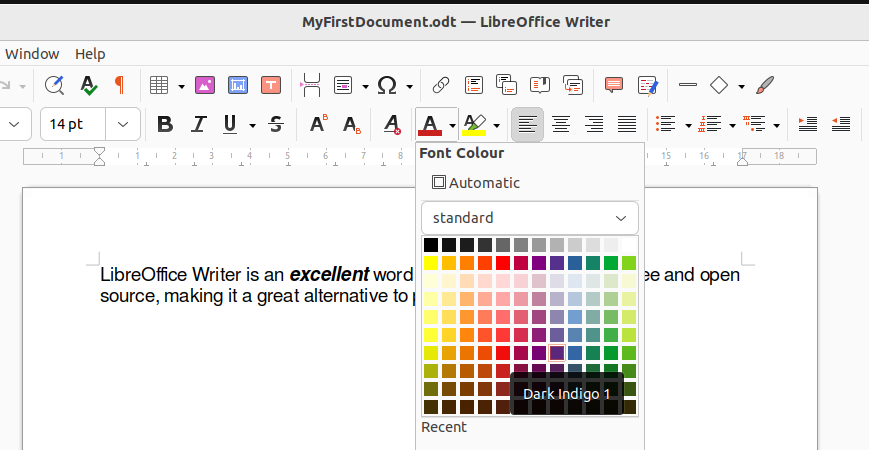
Text Colour:
- Highlight the text, then click the Font Colour icon (a letter with a colour bar underneath). Choose a colour from the palette.
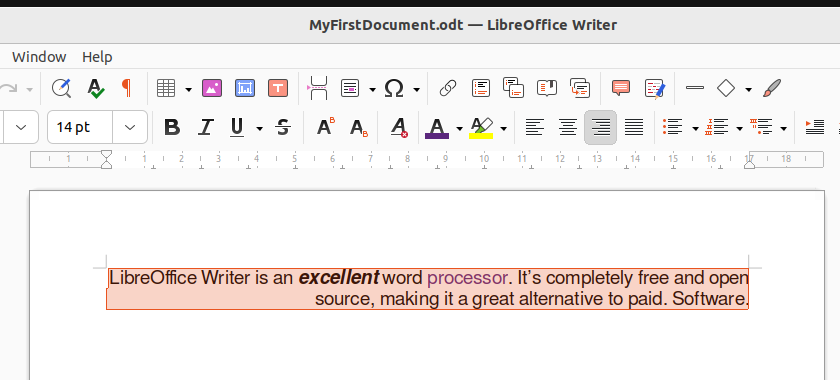
Text Alignment:
- Select the text.
- Click Align Left, Center, Align Right, or Justify from the toolbar.
Step 5: Using Paragraph Styles
Styles are a powerful tool in Writer. They allow you to maintain consistency in formatting, especially in long documents like reports or books.
Applying Paragraph Styles:
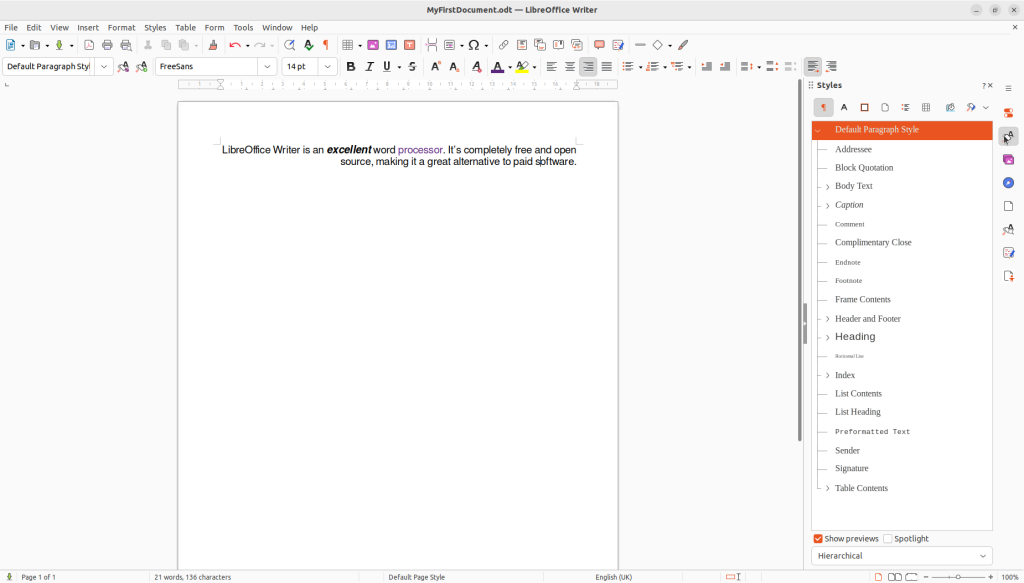
- Open the Styles Panel: Go to View > Styles or press F11.
- In the sidebar, you’ll see a list of styles like Heading 1, Heading 2, and Text Body.
- Place your cursor in the paragraph you want to format, then click on a style to apply it.
Customising Styles:
- Right-click a style in the sidebar and choose Modify to customise its font, size, alignment, and more.
Step 6: Inserting Tables, Images, and Hyperlinks
Let’s add some elements to enhance your document:
Inserting a Table:
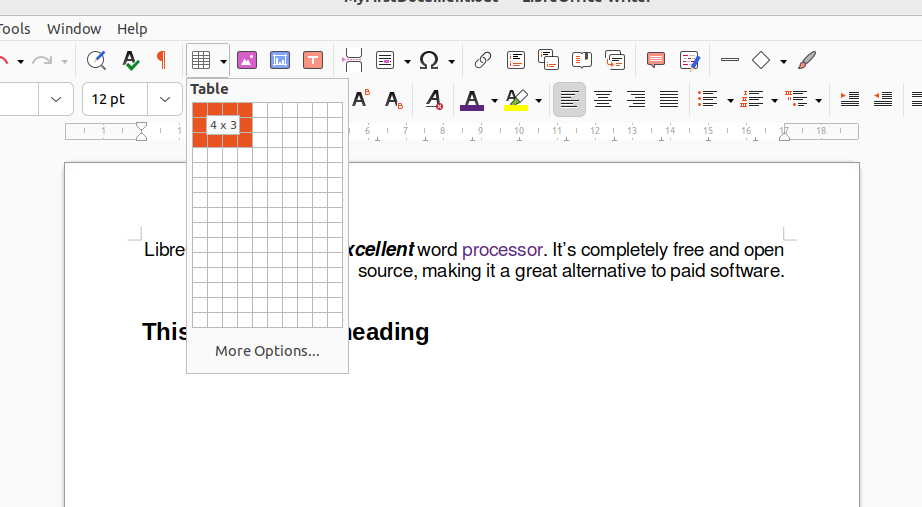
- Place your cursor where you want the table.
- Click Table > Insert Table.
- Choose the number of rows and columns (e.g., 3 rows, 3 columns), then click OK.
- Enter your data into the table cells.
Inserting an Image:
- Place your cursor where you want the image.
- Click Insert > Image.
- Browse to the image file on your computer, select it, and click Open.
- You can resize the image by clicking and dragging the corners.
Inserting a Hyperlink:
- Highlight the text you want to turn into a link.
- Click Insert > Hyperlink.
- In the dialog box, enter the URL (e.g., https://www.libreoffice.org) and click Apply.
Step 7: Saving and Exporting Documents
LibreOffice Writer allows you to save and export your documents in various formats.
Saving in Different Formats:
- Click File > Save As.
- Choose the format from the Save as type dropdown. Options include:
- ODF Text Document (.odt): LibreOffice’s native format.
- Microsoft Word (.docx): For sharing with Microsoft Office users.
- Rich Text Format (.rtf): For simple text with minimal formatting.
Exporting to PDF:
- Click File > Export As > Export As PDF.
- Customise the export options, such as page range and compression.
- Click Export and save the PDF.
Step 8: Document Templates
LibreOffice Writer includes a variety of built-in templates for letters, resumes, business cards, and more.
Using Templates:
- Click File > Templates > Manage Templates.
- Browse through the available templates, or search for specific types (e.g., “letter”).
- Click on a template to open it, then customise it with your content.
Creating Custom Templates:
- Create a document with your desired layout and formatting.
- Click File > Templates > Save As Template.
- Name your template and categorise it (e.g., Business).
- Your template will now appear in the Manage Templates dialog for future use.
Final Thoughts
Now that you’ve explored the basics of LibreOffice Writer, you’re well on your way to mastering this powerful word processor. From creating your first document to using styles and templates, Writer offers a comprehensive set of tools to help you create professional-quality documents with ease.
In the next post, we’ll dive deeper into intermediate Writer features such as working with tables of contents, footnotes, and more advanced formatting techniques. Stay tuned for more tips and exercises!